April 09, 2011

Spring Flowers Growing in the Roseville

I've begun work on my April UFO, #4, which is another Roseville block.  Here's the beginning--choosing the fabrics to use--quite a messy process for me.  My sewing room floor, work table and ironing board are covered in heaps of brightly colored fabrics (I was too embarrassed to take a photo to show you, so just imagine.)


I thought the fabric selection process was going pretty smoothly, but then some strange flowers began growing on my design wall, right in the middle of the Roseville blocks.  I had promised myself that if I finished March's UFO on time, I could play a little on something of my choice. These are from my playtime.
 
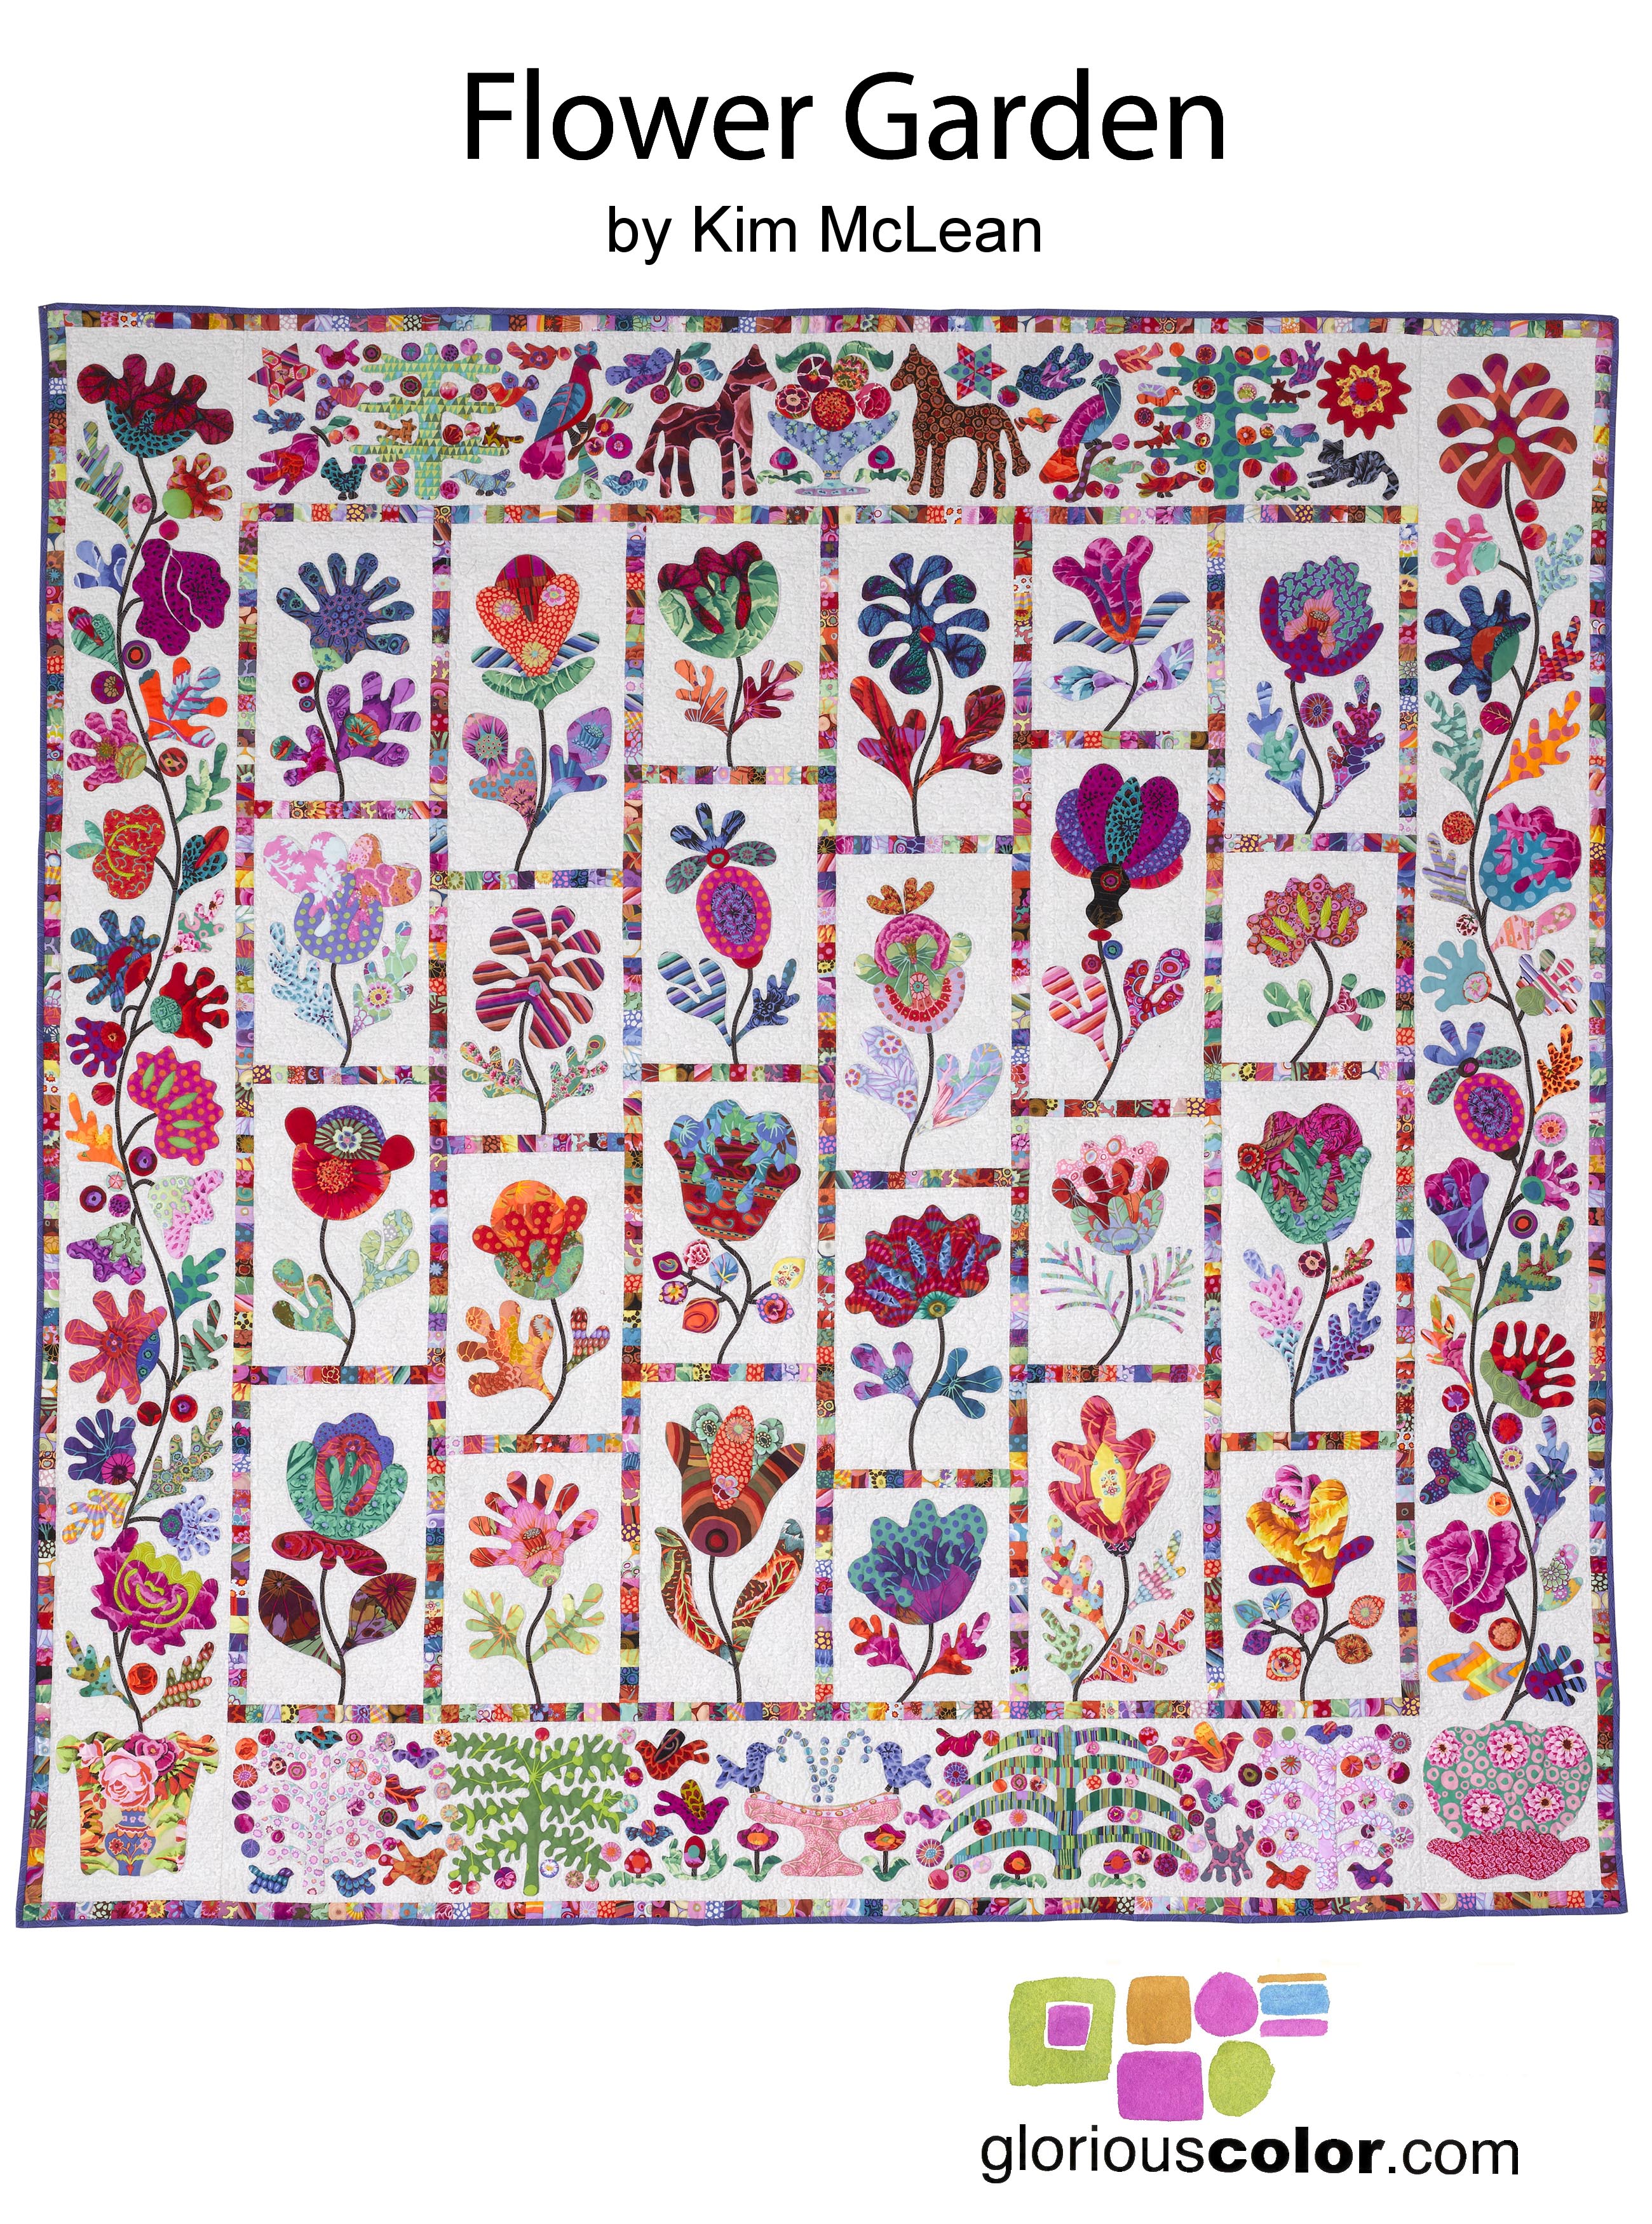
They are blocks from another quilt pattern designed by Kim McLean called Flower Garden.

I made the center of the one on the left larger than in the pattern.  (A stray circle from the Roseville wandered onto it and decided to stay.)  I liked the way it looked at the time, although in the photo here it looks a bit odd/unbalanced and a tad too big.  But after seeing the large circle on the flower, the smaller ones just didn't look right to me.  I let the flower choose.

I have to admit it is a relief to choose the colors and fabrics for these large flowers after the Roseville--fewer fabrics to choose and fewer colors to balance.   The stitching is easier too (although I miss all the color changes, so there's no making me happy.)

Working on these gives me something to stitch on at night since my Roseville block isn't ready for stitching--mainly because I've been dithering over which fabrics to use for the bowl on the Roseville block.   Here are the blocks which will go around it:  (X marks it's spot)


I'm planning to use the periwinkle aboriginal for the vase, but am debating the fabric to use for the cut out portions.  Here are some of the choices--which do you prefer?  (Sorry for the rotten photos--between losing my battery power and having Blogger stubbornly refuse to cooperate, these are a bit of a mess--I'd hoped the photos would make it clearer to me which to use.  Sometimes seeing a photo clarifies things a bit.)
Mably Red Scales

Jacobs Turquoise Variegated Ivy
 
Liberty Red Meadow
 
Jacobs Magenta Begonia
And that's all I've been working on this month.  I've been surprisingly good at staying away from my other projects (thus far--the month is young).  The mess in my sewing room isn't conducive to new projects (how could you even find them?!)  And the hardworking college student currently studying at my dining room table is slowing down the cutting of my large strips for the Stripping Vine quilt I started last month (I need the space to cut), so I haven't made a bit of progress on it.

I'm not really complaining--it's been absolutely wonderful to have the dd home for a bit (too short of time).  I may actually learn to stay on task, for awhile anyway... Happy Stitching!

April 03, 2011

C'est merveilleux!-- French General!

In my haste to post about my finished block for the UFO Challenge, I spaced out (do people still say that?) something I wanted to show! Look at what I won!


I was VERY lucky to win this wonderful French General kit--pattern, hexie template, and lots of gorgeous French General fabrics!   It was one of three great prizes in a giveaway celebrating Thelma's 250th post at her blog, Cupcakes 'n' Daisies.
 
Thelma always posts lots of photos of lovely quilts and her steps in the process of making them. I enjoy seeing the steps and learning about her decision making process, and it's fun to follow along, but I have to admit that Thelma makes me feel highly inefficient. She actually finishes her projects--they look great too!  And she has an organized sewing room! All right, I admit I read her blog hoping to learn her secrets!
 
Right now Thelma's leading a Quiltalong of the quilt Eventide, and it's worth reading about just to see the different fabrics variations people have chosen and how each changes the look of the quilt.  Here's her last Tuesday's Eventide posting.  Next Tuesday, April 5, is the Eventide parade, so you should visit and check all the different versions out!
 

I've never worked with (or even owned) any French General, and I'm excited to start on the kit, but admit the hexagons intimidate me a bit. They are quite large (5+ inches), and while that should be reassuring compared to the little ones, somehow the size is intimidating too. This is the pattern, Reine des Abeilles.  (I believe it means queen bee)
 
And somewhere lost in my sewing closet is a bin of little hexies and a bunch of vintage fabric and flowers garden circles I purchased already in process that I'd like to finish.  My fear of hexies needs to be conquered!  Each time someone posts photos of their hexie projects and English piecing, I'm intrigued--almost enough to give it a try.  I think winning this kit, is my nudge to get on with it.
 
So I'm going to save up courage for a couple months (and try to finish a few UFO's), but will likely give these scary hexies a try this summer or fall. So if you don't see some progress on them by fall, please remind me, and help get me past my Hexie Anxiety.  And Thank you so much Thelma--the fabrics are beautiful!  Merci beaucoup!

April 01, 2011

March UFO block--Finished!

I am happy to report that my March UFO in the Patchwork Times UFO Challenge is finished!


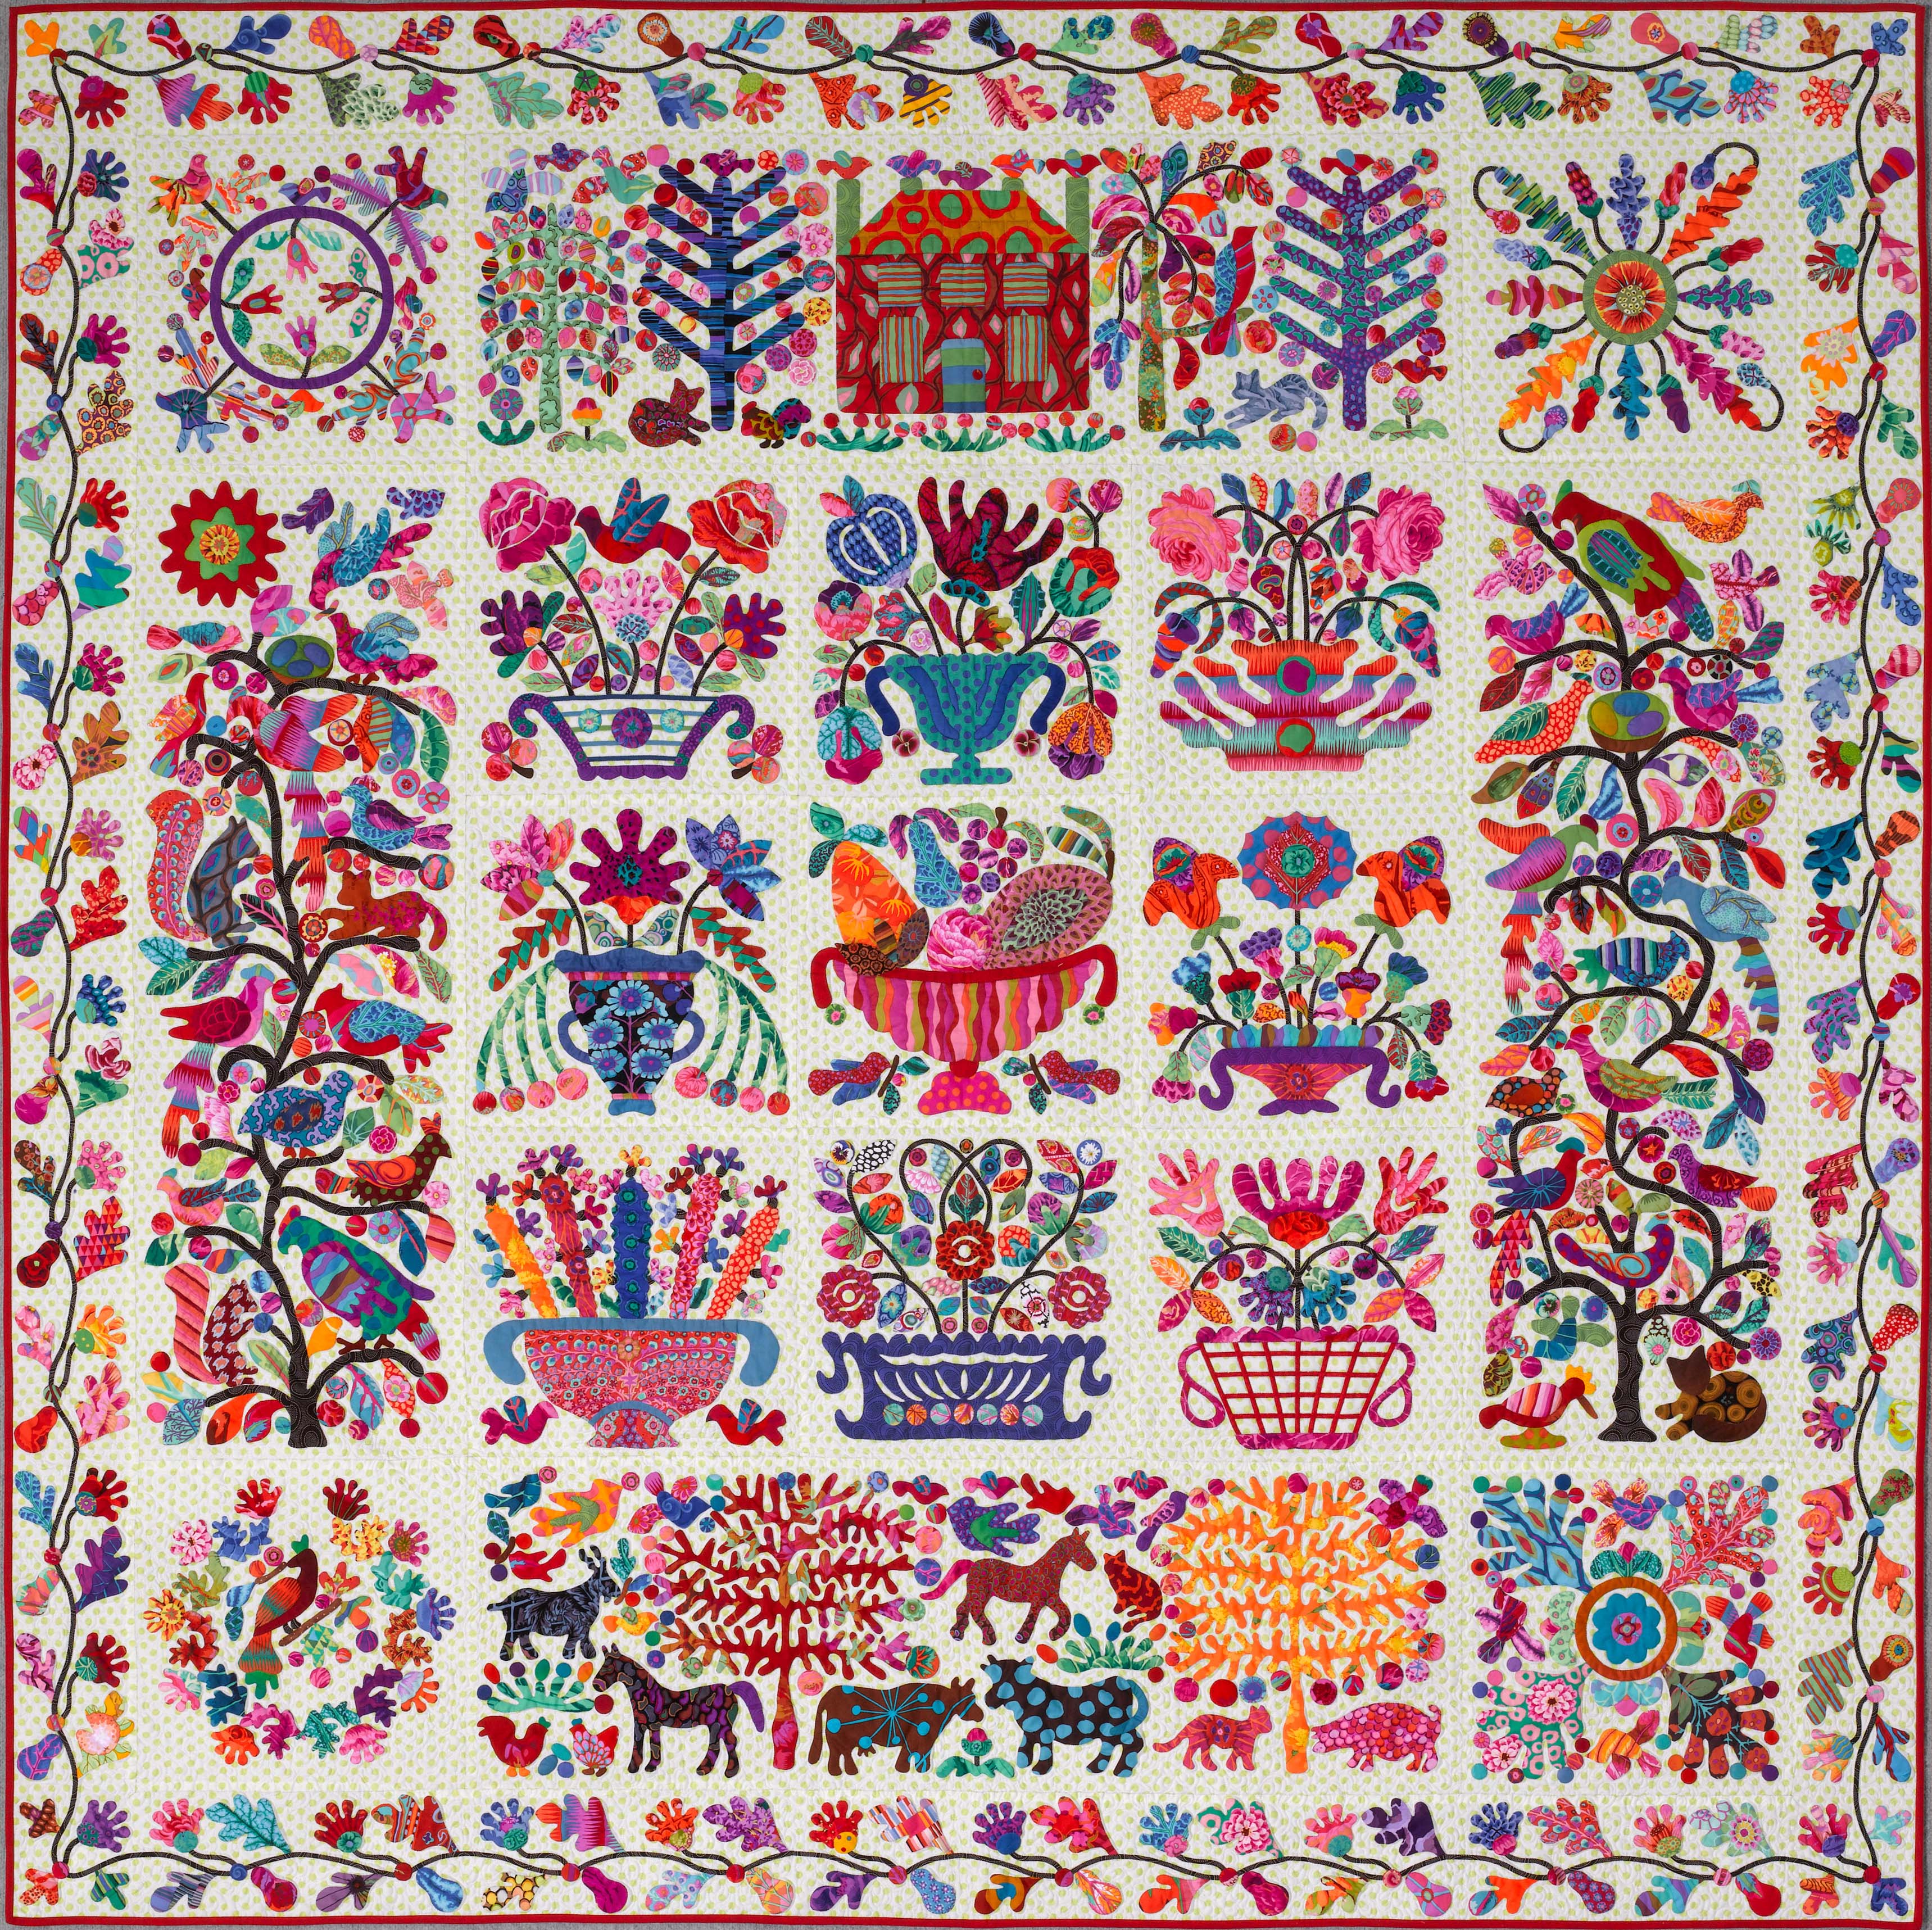
This month's UFO was #1, which was a block from the Roseville Album quilt by Kim McLean. I finally finished it last night--Hooray! Hooray!  And I've even started work on a couple more of the blocks too--too bad neither ended up being chosen as the April UFO block which is #4! 

I really enjoying working on the applique, but I'm very slow-- particularly slow at choosing fabrics for each piece, and then I agonize about the choices I've made.   Oh well...I am trying to just go on, promising that I will consider changing pieces only when ALL the blocks are finished and I can see them together.  It doesn't always work, but it helps stop me from changing everything.

Although I met my UFO goal for the month, I feel like it wasn't real progress because I actually started on THREE more new projects. (I just don't seem to be able to help myself--surprise surprise.) Here's a peek at one of my new unfinished projects:


This isn't how the blocks will be put together--just how they were up on my design wall.  I'll post more about these blocks as soon as I make a bit more progress, but they are destined for a quilt I saw in Material Obsession called Stripping Vine made by Kathy Doughty.

While I was cutting the pieces for those, I liked the colors together so well, I saved the scraps and cut some extra strips for another quilt (Single Girl by Denyse Schmidt) that I hope/plan to make soon.

I told myself I was just being efficient!  And while I had the cutting area clear, I cut out the background squares for the pattern, Flower Garden by Kim McLean.  I am using Kona Snow for the flower backgrounds, bright florals for the flowers, and am thinking about using a periwinkle polka dot for the border background.  I don't have any photos of that to share--there isn't much real progress.  I'll post again as soon as there's something more to see.  My dd is home from college for two more weeks and I plan to enjoy every moment, so it might be awhile.

Scorecard for 2011: Three UFO's completed (two Roseville Album blocks and one Cookbook cover) and SIX (yes SIX) new UFO's started!  Yikes!  I am beginning to understand how it is that I have so many unfinished projects!

Oh, and, everyone still reading this, please repeat after me...Happy, Happy Birthday Joanne!  Even if you don't know Joanne, I am sure she will feel the happy mental energy and positive thoughts from your birthday wishes.  Joanne H. is the nicest April Fool--well just the nicest person who happens to be born today. Hope you have a wonderful birthday, Joanne!

March 01, 2011

How UFO #10 Came to Be....and was Finished!

A couple years ago I decided to put copies of the recipes I usually make into a binder for both of my kids.  Before you start thinking sweet thoughts about my sentimental sharing of the tastes of home cooking, you should know that my main goal was to cut down on the number of last minute requests I got to "please email XXX recipe right now".  And while I worked on this idea (mostly mentally), eventually my son came home from college, became engaged to a wonderful girl, and didn't seem all that interested in cooking anymore. 

Later when thinking about a good shower gift for my future daughter-in-law, I thought of the recipe binder again.  Mainly to help her out...and not with cooking--she's a good cook already.  As I was growing up, my father would always sing the praises of the fabulously wonderful pies his mother made,  despite being busy with her eight children.  In response, my mother would try and try to make pies that would equal my grandmother's, but they never seemed to measure up.   (I didn't mind eating my mom's pies--they tasted just fine to me.)  I am guessing my dad remembers the pies as so delicious because with eight kids, pie was a real treat--not because the recipe was fantastic, but who knows.  My mom is still trying to make him the perfect pie.
 
Anyway, I decided I would complete my cookbook binder NOT so my DIL can make my "fabulous" recipes, but rather so that if her new husband raves about something his mother makes, DIL can look up my recipe, see that it isn't anything special, and make something BETTER, or can easily make the exact thing.  The gift is not so much the cookbook, but the demystifying of the MIL cooking--because believe me, my cooking isn't anything special, and one generation of pie making struggles is enough. 

I wanted to make the binder in their wedding colors which were blues and turquoises--here's her bouquet.

I put together my most frequent favorite recipes, added family photos, and pieced a cover for it in my interpretation of their wedding colors. Here are some somewhat terrible photos of it.


I also fixed a binder of the same recipes for my daughter, and gave it to her for Christmas. But I couldn't decide which colors to use for her cover (and to be honest, ran out of time), so this is what she got for Christmas--Christmas 2009.
 
After Christmas, my daughter suggested I use one of the blocks I had originally made for a quilt for her (another UFO!) as a basis for her cover. So I picked out some coordinating fabrics and began cutting and stitching. Then somewhere along the way I got interrupted...I'm not sure now why (probably another quilt idea), so I binned it all up.

And that is how Alex's Cookbook Cover came to be the Notorious UFO #10
 
 And, now only a year late, I am proud to announce that UFO #10 is Finished!

UFO #10 was not completed without a fight--it struggled to stay a UFO right up to the thready end.  It was one of those project on which things just went wrong.  First, I could not remember what the original plan was--the pieces I'd already cut just didn't fit together.   I also couldn't quite remember how I'd made the first binder cover. 
 
Eventually it was all stitched together.  I even had fun trying the decorative stitches on my borrowed sewing machine to quilt the layers together, and got a bit carried away with them.  Here's a close up of them.

Finally, I tossed the finished cover in the washer--on COLD.  (Since I always prewash all my fabrics, I didn't think anything of it.)  This is what it looked like going into the washer.


You can guess what happened.  Black, or maybe the dark turquoise, bled onto the yellow...it doesn't show up well here, but this is the area.
 
So...what to do?  Clearly I couldn't unpick it all.  I decided to applique some narrow bias strips of pink on top of the bad area, which wasn't easy with the stiffness of the quilted cover, but it worked.  Then, stupidly, I decided the bias pieces needed some embellishment. 
 
 
After stitching 3 times and unstitching 3 times, I finally got something semi-acceptable stitched on the front and not through the back pocket thingy.  Duh! 
 
So now the area looks like this.  I know the stitching isn't great--the machine didn't seem to want to evenly stitch across the quilted area, and this was my first time with the decorative stitches.  I would have picked it out again, but I was afraid the fabric would soon fall apart from all the wear.


Then I noticed there was actually a bit of a hole in the binder pocket thingy where I had apparently cut a loose thread a bit too closely. 

At this point, the whole project feels surreal, but I take it in stride.  Copying something I learned on the Glorious Applique blog, I  pull out one of the many circles I've premade for my Roseville Album quilt, and quickly applique a circle over the hole! (See the red spotted circle on the lower part) 

Finally done with the stitching, I excitedly put the cover on the binder.  What had been a desirable snug fit before it was washed, was now a very tight fit.  I'm just very glad the binder is more flexible than I am, because after an extreme backbend by the binder, the cover eventually went on!

And now UFO #10 is now FINISHED.......

Front

 although complete with a few unique and unplanned characteristics...

Back
  And now it's on to UFO #1 for March--a Roseville Album block!

February 27, 2011

Scrap Multiplication

Yikes, it's been almost a month since I last posted! Back then I had just finished the UFO Challenge for January with a few days to spare, and was feeling pretty good about keeping my resolutions (I know, I know only ONE month--big deal).

But I was also feeling ANTSY. I wanted to sew, but I hated to start something new with just a few days to go. So I decided to work on another of my UFO's (#7 -Teal Quilt to be specific.) I figured working ahead would give me some slack during the year. I managed to sew on the first of two borders, then I ran out of thread (and enthusiasm). I took a photo with the borders, but apparently it didn't work or is lost on my computer. So this is #7--just imagine narrow pink borders around it.)

Then, still being disciplined, I decided to clean up the sewing room to have working space for February's UFO.  But, after all the hand applique I'd been doing, I really was feeling the need for some mindless machine piecing. And I had a new (to me) Bernina to sew on since my old Viking machine was in the shop. (Many thanks to Patty for the loan of her machine!) Since seam allowances on different feet vary from machine to machine (at least for me), I knew I'd better not work on any old UFO's requiring precision piecing. And, didn't I need to start something new so the new machine would feel at home?

As luck would have it, I found a bin of scraps that I had (years ago) sorted by color into ziplock bags. I put the strips I found in my strip drawer, and looked at the remaining scraps. This got me thinking about a quilt named Maple Leaf Rag made by Sarah Fielke I'd seen in the book, Material Expressions 2. This quilt uses both strips and scraps, and wouldn't that free up more space in my cluttered sewing room? Surely it couldn't take that long, and I'd still have time to do UFO #10 for February, wouldn't I?
So yes, I started a new project just a couple days before February!

Maple Leaf Rag is a spiderweb type quilt. First I cut out the background pieces from some awfully stiff muslin (probably not a good choice, but I was anxious to get started, and it's done--thank goodness it will NEVER be hand quilted).


Then I used the darker small scraps to sew the background part. Of course, once these were done, I decided I should have had a better plan color wise. Oh well--I forged on. I'm just using scraps, and so be it, I thought. Then I started sewing the strips.


For the outer colors of the rings, Sarah's instructions say you need two full strips, and you do. I rarely had these, so of course I had to sort and sort to find something similar, or find the missing fabrics and cut more. So I decided to cut enough double strips so to not have to stop and cut more, and well, my drawer of strips grew into a LARGE bin of strips.

The instructions also say to pay close attention and lay the blocks out so you can keep the colors in each web put together right. This will give you a rough idea of a couple of the rings.
After making 4 blocks, I realized placement was definitely going to be a problem. I would either need to lay it all out on the floor, or to take stuff off my design wall which I didn't want to do. At this point a week of February is gone, and I realized I wasn't going to speedily finish this, so I stopped working on it. The book's directions are great, but it isn't a quick project, and the layout definitely requires you pay attention--so much for mindless stitching!

So I packed up this new project and looked at my (now) TWO bins of scraps. While stitching on the Maple Leaf Rag quilt, I had been using a fabric only once (except for the scrap backgrounds), and I had tossed the leftover strips into a basket. Some of these were quite long. I had also set aside the lighter strips that I didn't want to use. These discarded strips reminded me of another quilt I had intended to make someday--Courthouse Steps.

Since I had such a big mess of strips all over, and since I really didn't feel like working on February's UFO (#10), I figured I might as well sew these leftover strips into that quilt.  At last, some mindless stitching!  I rapidly stitched up several blocks.  (Key word is rapidly--they aren't exactly uniform in size, which will definitely make for some future finishing issues.)  Here are a few of the pinker/redder ones--they are primarily blue/black/red/pink/green.

When I had used up the larger strips (and about 40 blocks or more later), I started cleaning up again, sorting out the remaining shorter strips (4-8 inches).   Hmmmmm I thought. I can use these strips on another project with some squares I had leftover from some other cutting. (I figured it would only take a couple of hours and I'd have the shorter strips used up.)  So I stitched up the leftovers into these blocks which will have an end use (I'll show you someday--if I live long enough).

A week later, I put the rest of the short strips away, and put these half done blocks away, and FINISHED cleaning up the sewing room for February's UFO.  So where did that leave me? Did I finish anything?  Did I make more room by using up scraps? NO--I just made more scraps!

Scorecard for 2011: One UFO Roseville block completed, three, YES THREE NEW UFO's, NO quilts/projects completed!

ARRGH! And worse yet, I at that point, I hadn't even started on February's UFO with just a week to go. The UFO drawn for February was #10, Cookbook Cover.....it's NOW in process.  I've been sewing like a possessed woman, trying to make amends for starting three new projects!  More on UFO #10 later...

January 17, 2011

Number Six Finished for January UFO Challenge!

The number drawn for this month's Patchwork Times UFO Challenge was SIX, which meant I had two blocks to complete in January. Both of them were already in progress, which is why there were two.  (Normally it takes me the better part of a month to complete a block if I do anything else, and as a perpetual starter, I almost always start something else.)

But this month I've been unusually good, and I stayed focused on my number 6 to the point of obsession--probably because the weather outside has been either bitterly cold or raining and wet, making it awfully nice to curl up and stay warm. And so (cue the trumpets!)...

I'm excited to report that both blocks are FINISHED! 

The first one was finished January 7, which is amazing even to me.  (Of course it is a simpler block with fewer pieces than the other one.)  The second block was finished this morning! Here's how they turned out:


Now I've got to decide what to do with the rest of January...

Strange as it seems, I feel the need to start work on another UFO--not a new project. As much as I would like to think it is due to growing self-control, or the result of joining the UFO Challenge,  I think it is likely due to the fact that the mess from making the blocks and their fabric selections is so large in my sewing room that I feel the need to work on something outside of that room. (Cleaning is just not an attractive option.) Of course, it also helps that many of my UFO's are so old that they're almost like working on a new project!

I'll probably start work on one of my larger quilts that I need to lay out on the floor to see, probably number 7, unless I get distracted by something new.... Happy Stitching!

December 31, 2010

UFO Challenge Goals!

Since I seem to be starting more new projects than finishing them, I've decided to participate in the Patchwork Times UFO Challenge as my form of New Year's resolution making.  (If I only finish one UFO as a result, it'll be a good thing--and it certainly is easier to sew or quilt than it is to diet and exercise!) 

Though I decided to participate earlier, my UFO list remained among the UFO's--until tonight.  Facing tonight's deadline,  I finally sorted through a few of the more accessible UFO's.  It was difficult to select which projects I think I can discipline/force myself to work on!   But, here's my list....

1, 2, 3, 4, 5, & 6 - Roseville Album quilt blocks.  I've numbered the ones I plan to do in green (which is hard to see--sorry)  for the first 6 UFO's.  (There are 2 blocks in number 6 because I've started on them both, but they aren't done.)  For the others I hope to at least prep the block, and partially stitch it.  I'm incredibly slow, so we'll see how this goes.


7.  Teal quilt -This is huge (king or so) and needs borders and a back, and to be trimmed and readied to send for quilting when I can afford to pay for it!


8.  Patchwork pillows - These need to be pieced, quilted and stitched together.  They were started several years ago for my daughter's apartment, and though I may keep them now, the pillow forms are taking up valuable space and need to make themselves useful!


9.  Capriccio - Most of the pieces are cut, and some piecing has been done.  Realistically I'd like to sew the next step (the triangle blocks together into the squares).  In my dreams, I'd like to make the blocks themselves--maybe even sew it all together, but let's not get carried away!


10.  Cookbook cover - I started thinking about this and moving the fabrics around, but got interrupted and never went back despite the fabrics sitting in a bin for a year waiting for me.


11.  New Wave  and Watermelon quilts - Both need to be finished either with borders or without (I need to decide),  backs chosen, and readied (trimmed on the back) for quilting.  Then taken for quilting IF I decide they'll be too much for me to quilt.


12.  Sunshine and Shadow - This is an ancient quilt from the 1980's (I think the third quilt I've started or maybe the 4th--it's hard to remember)  It needs quite a bit of work on the borders (IF I remember correctly).  It may need to be changed in size to actually work on a bed too--might be more than can be finished, but I hope to at least progress it in the right direction, and formulate a plan of action for it.


There are at least a million other projects buried in my sewing room, which is kind of depressing to think about.  Hopefully after this next year, and FINISHING all of the UFO's above, I'll have a lot more space to work in! ;)

Hope you have a fabulously Happy (and very productive) New Year!

December 06, 2010

Sunshine in a Box!

Blah! It's another dreary wet day here! Even Tessa (our golden) seems glum with the weather we're having.

So it was perfect that a package came Saturday bringing much needed cheer! 
Talk about sunshine in a box--not only are the fabrics fantastic and bright, but they came wrapped in sunshiny yellow tissue paper! A perfect antidote to our foggy, grey weather.

Amy at Mrs. Schmenkman Quilts had a giveaway a while back, and I won a fat quarter set of Color Theory by Sandra Banava.  And Amy was so sweet--she added an extra packet of Kaffe's fabrics for me to use on my Roseville.  Swoon Swoon!  I love it all!  Thanks Thanks Amy!  I guarantee it has all found a good home! 

In fact, just Friday I picked up some Kim McLean patterns I had ordered at my local quilt shop, The Quilt Crossing, so there will be plenty of opportunities for these new fabrics to play an important role. Although first I may just gaze at them and adore them for a while soaking in their sunshine--they supply Vitamin D, don't they?  And no calories! 

             
I am trying not to get too excited about any of these new patterns since I'm still working on the Roseville, and will be for some time.  But I have to admit that last night when I went to bed, visions of bright colored quilts danced in my head....

Two of the Roseville's center blocks are all but completed (I left one circle off the one on the right by mistake), and I'm working on two more of the blocks, but don't expect much progress with the holidays.  Here are the two completed so far.

Happy Stitching!  (or Christmas shopping?!)


November 19, 2010

Full of Thanksgiving!

With Thanksgiving rapidly approaching, I've been busily trying to make my house presentable for my family. But, I want to take a moment's pause to send a very special BIG THANKS to Nan, who blogs at Pots and Pins

I am the very excited winner of Nan's recent 3rd Blog-a-versary Give-Away!   It is especially exciting to me because I am hosting Thanksgiving dinner for my family this year and have NO décor. Winning Nan's basket was perfect!

On Monday I had a horrible migraine, and was absolutely perplexed when a huge box suddenly appeared on my doorstep. It was even more perplexing when I looked at it because I couldn't imagine why I had addressed a huge box to myself-------Nan's handwriting looked just like mine!

Okay, so I was impaired already (duh), but it was quite funny when I remembered what it was--it shipped so quickly!  And I had a good laugh--laughter is the best medicine!  Someone else here thought the box was pretty interesting too!


And inside was a lovely basket filled with Thanksgiving goodies!! 

Have I opened the basket?? No, I am using it as motivation...IF...ok, WHEN I get my clean-up chores done, I get to open the package (or maybe sooner if I am weak--I have peeked a bit). So far it's working great as a motivator!                THANKS SO MUCH NAN!

AND,  if you are looking for recipe ideas for Thanksgiving, please visit Nan's blog.  She's got several dishes that look delicious--I've printed out several recipes. IF you have kids coming to dinner, her T Day party will give you some absolutely wonderful ideas--it looks like it was such fun!  Nan's kids table will beat most adult tables!

Hope you all have a wonderful Thanksgiving!!!  And thank you Nan!

November 16, 2010

Santas and Trees -- SewCalGal's Christmas Quilt Show 2010

This is my entry to the virtual quilt show of Christmas quilts that SewCalGal is hosting. 

It's from a commercial pattern I made about 20 years ago, and I'm sorry but I cannot remember the name of the designer...the pattern is apparently lost in my sewing room. 

Each of the blocks has several small pieces which made it quite time consuming to piece--not a good last minute Christmas decoration, but fun to make!  The Santa blocks have 24 pieces each.  To speed up the process, I cut actual size templates from freezer paper, then stacked 5 reds, whites, backgrounds, etc. and ironed the freezer paper pieces on the top of the stack allowing space around them.  Then I cut through all the layers with the ruler and rotary cutter, adding the seam allowance, which worked because each of the pieces has straight sides.  It wasn't super accurate, but was quicker with all the little pieces.  I did the same thing with the tree blocks (18 pieces each) and the tree border pieces.

In answer to some questions I've had, yes, the Santa hat is three dimensional, with a jingle bell at the end--here's a closer view of it:


If you'd like to enter one of your Christmas quilts in the show, you can read the rules (or visit the other quilts in the show) at SewCalGal's page.  You'll find many lovely quilts full of inspiration certain to get you in the mood for Christmas!
Happy Stitching!