Let's start with the two finishes (yes, only two since September.) First up is the Granny Square quilt for my mother-in-law (which was supposed to be for Mother's Day, but what's a few month's difference?)
 |
| Front |
With each size increase, I had to unpick the edges, and add on more, and more. All to make it fit the bed. And then increase the back size too.
Probably should have skipped the straight scrappy edge or cut it off, but oh well. I first added it to try to square up the quilt after picking and unpicking all those bias edges. Probably just should have just added the plain border months ago and been done with it sooner!
This is a close up so you can see Yvette's lovely quilting. We used a wool batt which really showed off the quilting designs as it retained just a little puffiness after washing.
It is in the colors (dusty pastels) that my mother-in-law favors--and really hard to find today. She seems to like it (more or less), although I should have included dusty pinks/mauves for her. But it is done and after 1 1/2 years, and I'm grateful to not have to see it again! (Or see some of the fabrics--like that back--that I've had for 20 years!)
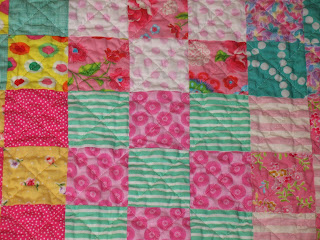
I also finished another baby quilt, using the scraps from the previous post's quilt. This is during the quilting process--just simple, straight lines across each square, marked with a hera marker at first, then I eyeballed it toward the end which seemed just as accurate. My sewing room really isn't as dark as this makes it seem.
Here's a close up view.
I had been unhappy with the waving edges on the baby quilt I finished in the prior post, and had theorized that the rippling was caused when I washed the quilt after it was finished and the batting shrunk, causing the machine stitched binding--which didn't shrink--to ripple.
So I changed the method with this quilt. I washed it after it was quilted, but before attaching the binding. Here it is after the binding was attached. Notice the awful rippling. I was pretty bummed about it because it wasn't consistently rippled. I have no idea why it occurred.
So I changed the method with this quilt. I washed it after it was quilted, but before attaching the binding. Here it is after the binding was attached. Notice the awful rippling. I was pretty bummed about it because it wasn't consistently rippled. I have no idea why it occurred.
Prewashing the quilt before adding a bias binding by machine is going to be my go to method now. And the quilt is just an extra bit softer from the extra washing, too!
This is the quilt back before the 2nd washing. The crosshatching didn't line up perfectly with the squares on the back, but often did (which is just a miracle), and the differences I can live with.
And those are the only finishes I can show you for the past 6 months. Sad, I know. Where does the time go? Next post, I'll show you what I started--maybe!
Happy Quilting, Merry Christmas & Happy New Year too!
Happy Quilting, Merry Christmas & Happy New Year too!


